photo Image277_1x1_zps92a4c832.gif photo Image277_1x2_zps82501ae2.gif photo Image277_1x3_zpse2f7619b.gif photo Image277_1x4_zpsbfd3d820.gif photo Image277_1x5_zps55244bd5.gif photo Image277_1x6_zpsa94012cf.gif
Showing posts with label anchor chart. Show all posts

Sunday, October 14, 2012

Teacher’s Gonna Snap

One day we were doing a special project, and one of the kids looked at me and said, “Aren’t you going to take some pictures?”

They know me well, already. Time to link up with Miss Nelson’s Got the Camera!

I am dying to win a cute camera strap, so here are a few photos from the last month(ish).

IMG_8594IMG_8561

Our awesome field trip to the airport to learn about the Tuskegee Airmen (and each student got to try flying in a flight simulator!).

IMG_8407

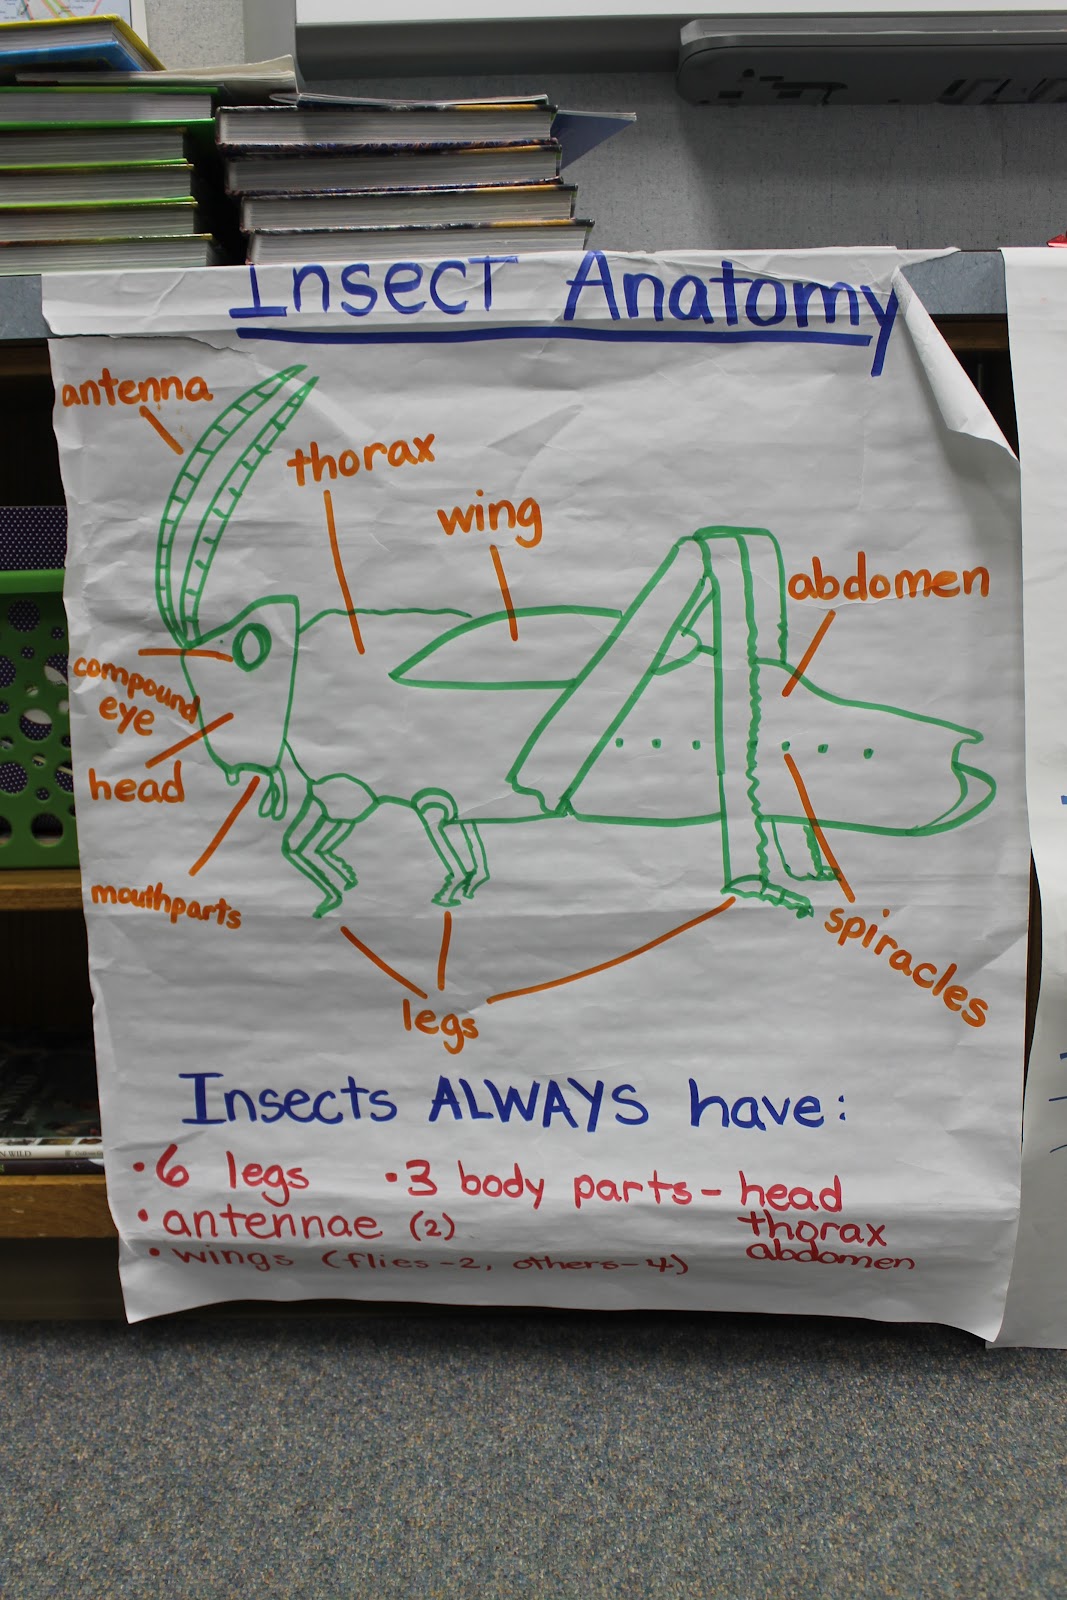
I love teaching about animal adaptations, and this year I got to add owl pellets.

IMG_8445-001IMG_8452-001

Owl pellet dissection- did you pick up your unit ideas and freebie yet?

IMG_8423IMG_8427

Field trip to the Farmer’s Market to learn about local agriculture, produce, and seeds. (The next week, we learned how to make butternut squash soup with one of our finds!)

IMG_8400IMG_8297IMG_8391

Our BFG Party to celebrate filling the cotton ball jar and finishing the novel (also with a freebie, if you didn’t pick it up yet!)

IMG_8405IMG_8078

So much content lately! We get together with 3 other classes monthly to do a science activity, and for the first one, we microwaved Ivory soap. Super cool. We also translated the Pledge of Allegiance into kid-friendly language.

IMG_8076IMG_8092

We’ve been starting The Daily 5/ CRAFT (but modified), and I think my favorite thing about the program may be the stamina piece. I have seen a big difference in some focus behaviors (especially with ADHD kids!) just because Read to Self also practices sitting relatively still for a significant amount of time. I also liked incorporating some graphing, though!

Our school had a special visit from Olympic gold medalist diver David Boudia! He was so nice and humble.

IMG_8409IMG_8085

We have been tuning into interesting words for reading and writing, and setting up our Writer’s Workshop binders with these categories.

IMG_8094

Finally, it’s the beginning of the year, so I feel like I’ve been doing endless assessment. But on the plus side, I can now do DIBELS Next on the iPad instead of doing them by hand or waiting for a finicky Palm Pilot!

I feel like we have done SO much in the past few weeks! I don’t bring my camera every day, but it’s been fun to document a few of our biggest events!

Have you linked up yet? :)

Friday, June 1, 2012

10 Things Every Teacher Should Do At The End of the School Year

Well, I've officially been out of school a week- and I still have tons left to do in my classroom. But I know that there are still lots of people finishing up this week or in the next few weeks, so I wanted to give just a quick end-of-the-year checklist!

Note: I'm not including things like "pack up your room" or "finish permanent files" because- let's face it- your school is going to remind you to do those things, and it's a little different everywhere. These are things to hold YOURSELF accountable to!


1) Take pictures of your room before you pack anything up. Even the messy parts.


And let photos convince you to keep less 'stuff'- I had quite a few anchor charts I loved and thought about keeping- but instead, I took a photo and recycled it! (Anchor charts are more meaningful when they're created with the class, anyway!)


2) Leave yourself more time than you think you will need to get everything done. The end kind of creeps up on you! (and you don't want to stay up until 5 in the morning, like me!)

My end-of-the-year gift to students- click the photo to read more!

4) Let students help you put things away or do basic cleaning (but do check regulations on letting students use something like Lysol wipes!). 40 little hands work a lot faster than 2 big ones!

3) Clean out students' supplies gradually. Don't plan to pack up everything in one afternoon, and don't send it all home in one afternoon (it gets heavy!). You might also want to pack up the morning of that last day to avoid having to rush!

I asked Target to donate 25 bags to me at the beginning of the year and we used them to hold the supplies we didn't need in our desks all the time. They made the first day so much easier- and then at the end of the year, all the little supplies were put in the bag to keep them all together. Worked so well!

5) Although parents love to be invited and included at the end of the year, make sure you also allow some time for just you and your students to spend together. I kept our class awards 'just for our class family' and put the kids in two lines with an aisle down the middle.They got to high-five and congratulate and cheer on their friends as they walked to get awards, and it felt so special to have time just 'us'!

I used these ADORABLE free awards from Inspired in Second! Click the picture to go check them out.

6) Organize it now. Don't tell yourself you'll do it in August!


(I just organized my math manipulatives better, and now I am working on my classroom library- it desperately needs it and I know my time will fill up during back-to-school time!)


7) Make a list of the things you did this year. For me, I did this with my students (who remembered things I would've forgotten) in a timeline. This will really help my next year planning!


8) Create a one-stop resource for yourself with important computer logins and passwords. I know I have them all memorized now, but in a few months? I will probably forget them all!


9) Check your classroom supplies, and start lists! What classroom supplies do you need to buy, want to keep an eye out for, or want to request from parents next year? What things do you need to remember to do for back-to-school? What new lesson or unit ideas do you have? What projects do you plan to work on? (For me, that one's less of a list and more of a Pinterest board ;)  For me, making lists and adding to them as I think of things through the summer helps me stress less about forgetting them. I use a little notebook that I keep in my purse so it's always with me!

Click the picture to go to a tutorial on giving your mini-book a "makeover"!

10) Write thank-you notes or cards to those who have helped you through the year. I had my students help me with cards for the businesses and people that helped with our lemonade stand, as well as for parent volunteers and room moms. (This makes a GREAT last-day-of-school activity!)


I also write thank-you notes to our secretaries and custodians, usually accompanied by some sort of baked goods. It doesn't have to be much, but if your school is anything like mine... my principal is great, but our school would not RUN without the secretaries and custodians! (And I'm pretty sure our principal would agree!) If you have an aide or assistant, make sure you thank them too!

New teachers, make sure you also thank any mentors- official, assigned, or neither! I know I have a few colleagues in particular that deserve an extra thank you for helping me make it through my first year.

And don't forget thank you notes for any gifts students gave you!

If you are looking to make sure you've done EVERYTHING you should at the end of the year, check this list at Scholastic- it has some great tips from a teacher who's been doing this a lot longer than I have!

Monday, April 30, 2012

Teacher Invention Linky Party


At my school, we use the Treasures reading series. Our story this week is African-American Inventors.

(Has anyone else noticed that this series puts anything remotely connected to a holiday or special month about as far from that time of year as possible? Perfect story for Columbus Day? Let's put it in the Spring! *soapbox off*)

I always spend part of Monday building background knowledge and gearing kids up for the story. Most of my kids know what it means to invent, so it was time to dig deeper.


We discussed why inventors create new things- because of a need, to solve a problem, or to improve what we already have in some way.


We also looked at how products that satisfy the same basic want, like listening to music, have changed over time. (The record is John Denver because that was my mom's favorite artist! I don't know what's up with the 8-track, or why the CD looks so... ahem, inappropriate- but you get the point!)

This particular example is always interesting to me, because I had a stereo when I was little that had an 8-track, even though that was pretty old technology by that point (yes, I'm young). Still- to think of how many changes there have been in JUST my short lifetime of a quarter decade... it's pretty crazy. (I mean, my uncle sold car phones when I was a kid- remember those things?!)

So I asked the kids to imagine what kind of inventions they think they will see in their lifetimes.

I gave them the day to think, but tomorrow they're going to discuss with a friend and then write and draw an invention they think someone will have created when they are 100 years old! They will also need to justify why that invention will be created.


This could also work really well for a short 100 day prompt! I included a more traditional prompt, too, about "if I could invent anything, it would be..." so feel free to snag a copy of my invention writing paper here. I kept it very simple because I plan on backing it with construction paper and I have a feeling my kids will make their illustrations plenty 'busy'!

If you're visiting from Classroom Freebies' Manic Monday, welcome and thanks for stopping by! I hope you'll grab the freebie, leave a comment, and stick around awhile!


Classroom Freebies Manic Monday


If you're a regular around here... don't forget to stop by Manic Monday for some fabulous freebies!

Now, for the fun part- as a teacher, what invention would you love to create? I'm hosting my VERY FIRST linky party, and I can't wait for you to join up and spread the word!

As much as I would love an automatic paper-grader tonight, I think the invention I would love most would be some kind of armband that automatically vibrates every minute or so to remind some of those super-distractable kiddos to get back to work

Imagine, me not having to say "______, get back to work" and "______, keep going" all day! I think both the kid AND I would enjoy that!

What about you? Snag the image below (thanks to The 3AM Teacher and KevinandAmanda.com for the frame and fonts, respectively!) and join the...

Sunday, April 22, 2012

Introducing Fractions with a Story

I never get as much done on the weekends as I would like, but lately my weekends have consisted of sitting around and doing nothing, so I haven't had an excuse!

My weekend so far:
- Surprised a co-worker on her birthday (just a little surprise!)
- Went to my husband's improv show and went onstage as a volunteer (and actually did okay!)
- Went to a thirty-one purse party (not usually a purse girl, but I'm excited to get my order!)
- Tried out a new local restaurant (mmm chili on top of mac 'n cheese in a breadbowl)
- Got the chance to see some out of town friends (over frozen yogurt!)

For once, I have an excuse for not getting much done on the weekend.

Anyway, this will be a super simple post, but I wanted to share with you how I introduced fractions. I love to tell stories and incorporate the learning into it, usually with some (very) quick sketching on chart paper.

By 2nd grade, they already have some background knowledge, but even outside of 'school' fraction learning, almost every kid knows what 'half' means.


 Me: So my little brother and I were hanging out and we decided to go and get a pizza. He cut the pizza in half. (draw the blue line)
Class: What!? No! That's not fair!
Me: What do you mean? He cut the pizza into two parts...
Student: But the two parts aren't the same size!
Me: Wait, so 1/2 means two EQUAL parts? How should we have split the pizza?


(Student drew the blue line.)
Me: OHHHH. So we should have each gotten the same amount of pizza.
Class: Yessss!

Me: Okay, I get it. So then we got some breadsticks. There were four breadsticks in the order, and my brother was so nice. He gave me half of the breadsticks. (Draw the blue line.)


Class: Nooooo! That's not fair! That's not half!
Me: Wait. That isn't half? Who can tell me why?
Student: Because he got three and you only got one and that's not fair!
Me: But I thought half meant splitting something into two parts. Here's my brother's part, and here's my part. Two parts!
Student: NOOOO. The two parts have to be the SAME!
Me: So half means something has been split into two EQUAL parts. Ohhhhh. So how would I really split these in half?


(Student draws the blue line.)
Me: Okay, so for dessert, my brother and I went back and shared a pie with my mom. He cut the pie, and then he gave himself one part out of 3 parts. So... 1 out of 3. (Writing the fraction)
Class: NOOOOOO!!
Me: Oh no. I almost forgot. Fractions have to have a certain kind of parts. Can you help me? Fractions must have-
Class: EQUAL PARTS!
Me: So why isn't this 1/3?
Student: Because the parts aren't equal!


Me: So let's see. We should have split the pie into three EQUAL parts! What if we split the pie this way?
Class: YES!


Me: And how do you know that I got 1/3 of the pie? Whisper your answer to your neighbor.
(silent countdown) Okay, who wants to share how they knew this is 1/3?
Student: Because you got one of the pieces and the pie is in 3 equal pieces.
Me: Oooh! Oooh! Did you hear her? WHAT kind of pieces do fractions have to have?
Class: EQUAL pieces!
Me: Okay, let's write out what we've learned about fractions.

And then we made this anchor chart:


It's nothing crazy groundbreaking, but it does remind students that parts of a whole can mean a whole object OR a whole group, which is always tricky for my kids.

Afterwards, a few of my kids were very concerned that the whole pizza story with my brother really happened. At first, I think they just thought he was really mean. And when I explained that he wasn't really that mean, their concern seemed to be that maybe he just wasn't very smart and didn't understand fractions. I had to assure them that I made up the whole story, and that the only reason my brother would try to eat more breadsticks is as a joke because he likes them so much!

Hope you are having a great weekend!

Monday, April 16, 2012

Teacher Must-Haves

Another week already! Didn't the weekend just start?

Little Miss Glamour Goes to Kindergarten is hosting a linky party all about classroom must-haves. I tried to think of this as though I had to pick THE most important things to have, not as a wish list.


1.  Post-It notes are part of what keep me organized. Sometimes to keep from clutter multiplying, I keep them on the block and just fold it up when I need the next page.  I also use Super Sticky Post-Its for some labeling in my room, like on my lunch choice buckets. (Dollar Tree + Post-Its = Cheap! And they've stuck all year!)

2.  Of course, books are a big deal. I'm a new teacher, but I've put a lot of time, energy, and money into making sure I have lots of classroom books- and it is SO worth it. (Tips for books on the cheap? Look here.)


3.  Math manipulatives have been a big one for me. I was an add-on section this year, so I wasn't taking over someone else's room but starting from scratch. I didn't have Unifix cubes, pattern blocks, 3-D solids, place value blocks, or anything like that, and I kept finding things I needed as the year went on. You don't realize how necessary those things are until you teach money and you don't have enough plastic coins!

4.  Chart paper and markers are a must for me. I ran out of chart paper one day and I felt like my teaching was completely different. I use chart paper, we use chart paper together, the kids use chart paper... and good, colorful markers are a must!

Kind of beat up by the time I got a picture, but I was incredibly proud of this one!
Click on the picture to go to my post about this one and get some free pepper writing paper!
Kid-friendly Pledge of Allegiance- Click the photo for my post about it!

5.  Finally, my behavior clip chart. It wasn't my original idea, but I modified my chart to include "Sparkling" at the top by adding glittery scrapbook paper. My students LOVE it. When they reach Sparkling, my students get to sign the Sparkling Hall of Fame, which is on the outside door of the classroom. It's basically just a labeled, laminated black piece of construction paper, but signing with a silver Sharpie makes it exciting! They also take home a sparkly sticker on their newsletter and a certificate. (I usually get 25/ $1 at Target or Dollar Tree.)


The kids love it, and it is SO easy for me. I just have Sparkling certificates filled out and waiting for a name and date at the end of the day. I have Think Sheets for anyone on red, too, where I just fill out name and date and check the rules that weren't followed. I even have a kid whose job it is to record where kids were on a chart for documentation and move the clips back to green (see mini clipboard), so I don't have to do it every day.

The best things about the clip chart are that I get to focus on the positives and that students can always clip back up, so the day is never "over." Plus, it's easy (and inexpensive) for me to manage, and the kids encourage each other so much. (So cute to hear them cheer when someone else reaches Sparkling!)

So, those are my big 5. Post-Its are mostly a splurge to make me happy, but the other 4 are absolutely vital to my teaching!

Thanks, Kristin, for hosting this fun linky party, and to everyone else- link up and give me ideas to splurge on this summer!