photo Image277_1x1_zps92a4c832.gif photo Image277_1x2_zps82501ae2.gif photo Image277_1x3_zpse2f7619b.gif photo Image277_1x4_zpsbfd3d820.gif photo Image277_1x5_zps55244bd5.gif photo Image277_1x6_zpsa94012cf.gif
Showing posts with label writing. Show all posts

Thursday, February 28, 2013

Test Prep Freebie! - Reversing the Question

Well, most of you out there seem to be gearing up for Read Across America with Seussy activities all week. We did make "Oobleck" yesterday with our younger grade buddies, but otherwise, we're spending a lot of this week doing the oh-so-fun test prep!

I don't enjoy test prep, and I don't think it's the best thing for my students, so really, we haven't done much up until now. We've stuck to quality educational activities that hopefully will transfer to the test. But considering how high-stakes our tests are (without an exemption, students can be held back for not passing a 3rd grade reading test), some of my students are worried and I want them to feel prepared.

"Test Prep" In My Classroom:
  • Do massive amounts of review. (Honestly, that's a good thing no matter the purpose.) There's nothing like a 3rd grader going, "What's a noun again?" in February to make you freak out a little.
  • Show students the test format, and give students practice using a similar test format so they feel comfortable with it. Most of my kids are like, "Oh. That's it?"
  • Let students see some feedback on their practice, especially those who speed through it, fail to follow directions, or don't work very carefully.
  • Teach them about tests as a "genre" that we read differently, just as we read other genres differently than each other.
  • Talk briefly about strategies for ones they don't know, and tell them that "pass" doesn't mean "perfect."
  • Show them the writing rubric. (It's important for them to know how they will be scored!) I'm letting them score their own writing to see how they would do. (They are so hard on themselves!)
  • I also share with them a few things from the state website, and a few tips for destressing (for instance: smiling and positive thinking are both proven to help you relax and do better).

It's not my favorite thing to teach- but I tell my students this is a chance to "show what they know" and I want them to know what to expect and to feel confident when testing time comes. And since we will be spending next week testing, the week after that is Spring Break, and the week after that testing, I think it's worth spending a bit of time letting them know what to expect and building their confidence.

This is my first year in a state testing grade, and I have to say, I'm a little terrified myself. My school has a very strong test record in part due to the homes most of our students come from, so chances are very good that they will do just fine. Still, it's nerve-wracking and I will be way happy when our testing is done.

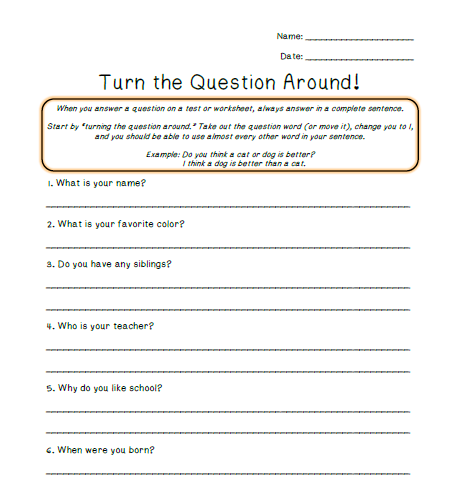
Since our Indiana test starts with "Applied Skills," the open-ended and writing portions, we're practicing how to "turn the question around," or reverse the question, in order to help us write our answer in a complete sentence. I think it helps kids be able to for sure answer what the question is really asking, too.

I teach them to cross out the question word (who, what, when, etc.), move the verb, and switch personal pronouns from you/ your/ etc. to I/me/my. I also talk to them about the partners of why/because and how/by.

We did a game of Inside-Outside Circle to practice orally, and did two worksheets (different days) to practice and assess.


Is this something you teach?


If it is, be sure to check out this product here. Feedback and comments would make my (test-stressed) heart happy!

(Note: this product was formerly free for followers, but is now a paid product. Be sure to follow my blog so you don't miss out on future freebies!)

Monday, January 14, 2013

Explanatory Writing Freebie!

Oh my goodness. Was it just me, or did the last week of school last about 500 years? By Friday, I was feeling tired- but we had an awesome afternoon that helped perk me up for the weekend.

Last week we started our unit on Explanatory Writing. Here’s how the week went:
  • Monday: Watch BrainPop Jr. and make an anchor chart about explanatory writing.
  • Tuesday: Together, write an explanatory writing piece on chart paper. Brainstorm out loud with partners.
  • Wednesday: Review the elements of explanatory writing. Mime out making a sandwich. Write the first draft.
  • Thursday: Finish first drafts and edit/ revise for at least 15 minutes.
  • Friday: Publish onto special writing paper, adding illustrations in the time left.
  • Friday afternoon: Their “alien” teacher, who has never seen a sandwich before, tries to make the sandwiches using only their instructions. (A few years ago, I wore an alien hat from the dollar store to make this even more entertaining.)
Photos (taken by kids, so sorry if some are blurry!):

IMG_0174IMG_0175
One student never told me to use a knife to spread the jelly, and another just told me to spread the peanut butter and jelly “on the bread” without having me get out pieces.

IMG_0177IMG_0183
Their favorite! One set of instructions never told me where to spread the peanut butter and jelly, so I put them on my face.

IMG_0184IMG_0178
Here’s one that told me to “put the peanut butter on one piece and the jelly on the other. Enjoy!”

IMG_0179
At the end, I showed them how an alien enjoys their sandwich.

Seriously, it was so much fun.

IMG_0182

They also learned some valuable lessons about how to be very, very specific when writing directions.

In past years, I’ve also done this as “How to Brush Your Teeth” when I had a peanut allergy in the classroom. I promise, it’s still funny when you put the toothpaste on the wrong part of the toothbrush, or they don’t tell you to take the cap off of the toothpaste, or when you put the whole tube on top of the toothbrush and then try to fit it in your mouth.

Next week, my students will get to write an explanatory piece of their choice, giving directions for how to do something. I’m excited to see how they improve!

If you’d like to download a copy of our explanatory writing paper, and my rubric for grading their writing, click the picture below and please say {thanks!}


P.S... While you're picking up the freebie, maybe follow my TpT store?

(Because I started one, finally, and I'm really self-conscious :)

I plan on moving most of my freebies over there so I can see how many people download them, and at some point I'll probably try to make a unit or two to sell. But that's not going to happen until these grade cards are done!

(Tips, tricks, advice totally welcome!)

Linking up with Manic Monday at Classroom Freebies!

Classroom Freebies Manic Monday

Saturday, January 5, 2013

Guest Blogger Jennifer- Common Core Math Word Problems!

Surprise! Today I’m participating in a special linky party by welcoming Jennifer as a guest blogger.

Hey! It’s Jennifer from the Elementary School Garden. I’m super excited to be guest blogging about creating Common Core aligned word problems to use in your classroom.

clip_image002

We all want our students to grow as mathematicians and as an added bonus…succeed on standardized tests. Incorporating more thought-provoking, relevant word problems can make a huge difference.

So, how do we create Common Core aligned word problems? The most important documents I have found are Tables 1 and 2 of the Common Core Standards for Mathematics. These tables break down the different ways to write an addition, subtraction, multiplication, or division problem. I model my word problems after these varied examples.

clip_image004

Here are some tips to help you create math word problems:

#1 – Use Table 1 and 2 as a guide. Observe the different ways that word problems can be laid out and model yours after them. You want students to be exposed to a variety of formatting and questioning language and these tables will help with just that.

#2 – Connect the math to real world situations. Make the problems relevant for students.

#3 - Use your students’ names. A smile always creeps across my students’ faces when they see their name written on a worksheet.

#4 – Mix them up. If you provide students with only addition problems all week…they are immediately going to think the next problem is addition. Mix up problems with various operations so that students figure out how to determine which operation is needed to solve the problem.

Lately, I have been creating worksheets that contain just one math word problem. I pair students up to collaborate and solve the problem. I encourage them to show their work in as many ways as possible. I prompt them to explain how they found their answer and write about it. After providing students time to read, solve, and discuss their answers with partners, we then regroup and discuss the solutions as a group. I strategically select students to come to the board and demonstrate how they solved the problem and to discuss how they arrived at their solution. While students present I make connections between their answers and guide them.

clip_image006

I’ve created packs of these word problems and have a little freebie to share with you. Included is a word problem worksheet for addition, subtraction, multiplication, division, and a 2-step problem along with a blank worksheet for you to create your own word problem. Download my Woodland Animal Problem Solving Sheets for free!

clip_image008

Want more common core aligned math word problem resources? Check out my blog for links to my products and a chance to win my math problem packs for free!

clip_image010

Thanks so much for stopping by and bringing an awesome freebie, Jennifer! I can’t wait to use those tables and resources in my students’ math journals.

Once you’ve gotten a chance to visit Jennifer, hop on over to Simply Skilled in Second, where I’m guest blogging today about Stairstep Editing!

For a full list of the bloggers participating in today’s swap, check out Primary Possibilities. Thanks, ladies!

Saturday, August 25, 2012

Open House or Meet the Teacher Night for New Teachers- FIVE freebies!

I've been running a series of new teacher tips called I Just Got a Teaching Job… Now What?!


I don’t know about you, but for me, meeting the kids is nowhere near as nerve-wracking as meeting the parents.

If your school has Open House, Back to School Night, Meet the Teacher Night, or anything of the sort, it’s probably one of your biggest worries as a new teacher. For me, I student taught in Spring- so I hadn’t been part of any of this beginning of the year stuff, and I felt downright clueless.

Since my parents didn’t officially come in before the first day, I made a brochure to leave on my door during registration with very basic information to know before school even started. Not every parent picked one up, but I had two or three parents mention it later, so I think it was a good move!

IMG_7927

Yes, the Scotch tape is not the best look, but it was falling apart without it!

IMG_7928

This is one of those areas where talking to your fellow co-workers is so very important. You need to know:

- Is there an open house?
- Is open house before school starts, or after?
- Is there a set day/ time for the whole school or grade level, or do I choose when to have it for my class?
- Are students invited? What about siblings?
- What things do you hand out and talk about? Can I have copies? (Remember- digital is best for easy tweaking and not having to reinvent the wheel!)
- What sort of things do you set out for parents? Do you have them fill anything out?

At my old school, it happened before school, for the whole school on the same night, with a specific schedule. At my new school, we have a “walkabout” on the first day where parents can visit their child’s classroom before leaving, and most teachers also have their own parent meeting or open house in the next couple of weeks.

The time of your open house makes a big difference on what to do. It’s also a good idea to find out or decide if there’s a specific time frame for all of the parents to listen to you present, or if families will trickle in and out over a longer time frame.

If your open house occurs before school starts, think about what parents need to know. You need to tell them:
  • what their child needs for the first day
  • how to best prepare their child for a new school year
  • how to communicate with you, and how you will communicate with them
  • that you are competent and confident
And the kids want to know:
  • where your room is
  • where their desk is
  • something about their teacher
  • something that will get them excited about the year!
When parents arrived at open house (for me, it was the 2nd week of school), here’s what they saw.

IMG_7938

The Target pocket chart had directions, and then I put out a parent sheet and packet. The sheet I wanted them to return was BRIGHT pink, to hopefully make it stand out.

IMG_8071

Grab your freebie copies of the parent information sheet and generic parent packet here.

When parents are trickling in, you want them to have something to do. I like to have things the kids are excited about, because then the kids drag their parents straight to their desks.

I had my kids give their parents a “quiz.” That day at school, kids filled out their favorites, and a note to their parent.

IMG_8007

When parents got there, the right answers were hidden, and the kids got to give their parents a quiz and grade it. (The novelty of this is so amusing to 3rd graders.)

IMG_8008

I got the quiz from Rachel at Minds in Bloom. You can pick up her freebie here.

After a quick summary of the packet from me, I gave parents time to check out a couple of stations where things were set out for them. I like to use some kind of tripod sign to make it clear where things are, and don’t forget to leave out some pens and pencils. Flower pens are great for making sure they don’t disappear! (You can see how to make flower pens here.)

IMG_8064IMG_8068

You can also get a copy of my parent volunteer form here (free).

The kids also got to share some of the work they’d done- a mini-book, Graphing Myself (grab as a freebie from The Tattooed Teacher!), and an All About Me writing project.

IMG_8012IMG_8049

This was our first writing project. I model brainstorming important things about myself, such as things I like, things I’m good at, things about my family, places I’ve been, what I look like, how old I am, and if I’m a boy or girl.

IMG_8063
IMG_8051

Kids can use more than one page if they need to, and I staple them together along the top.

IMG_8054
Then, we glue it onto a big piece of construction paper folded in half. When parents come, they read the All About Me’s and see if they can guess who the page belongs to. If they think they know, they lift up the flap, and…

IMG_8050

see if they are right! We discuss ahead of time that their head should almost fill the page, and that they don’t look like a smiley face. We have noses, eyebrows, and eyes that don’t look like just dots. Unless long hair is covering them we have ears, too! We really focus on filling the page and adding lots of detail, and they turn out great.

IMG_8057IMG_8056IMG_8062IMG_8060IMG_8059IMG_8058IMG_8061
The kids love seeing if they can stump their parents, and they make a really nice keepsake. I also hang onto them until the end of the year so kids can see the difference in their writing skills, their handwriting, and their drawing.

You can pick up a freebie copy of the All About Me writing sheet here.

A couple last tips:
- Make sure you have a parent conference sign-up sheet, so that parents with concerns can be pointed in the direction of a sign-up, and hopefully you won’t have to stay all night.
- Get yourself a new outfit for the night. You don’t want to do the whole try-on-10-outfits-until-you’re-satisfied thing and be late! Don’t forget a piece of jewelry or two- I’m no fashionista, but you want to look pulled together to both make a good impression and to feel confident.
- Consider making a quick slideshow of the basics you want to cover. It’ll help you focus on your presentation.
- Good luck! :)

To recap, here are your freebies:
Parent Information Sheet (updated for 2013-2014)
Parent Packet for Open House (editable .doc)
Parent Volunteer Form
All About Me writing page
Parent Conference Sign-Up

And links to 2 freebies from friends:
Graphing Myself from The Tattooed Teacher
Parent Night Quiz from Minds in Bloom

Whew. I hope this helps! I’d be so happy if you’d consider following or pinning anything you love, too! Happy back-to-school time!

Sunday, May 20, 2012

Lemonade Stand Re-cap!

To do a quick re-cap of what happened for us a few weeks ago...

 We spent our morning learning about capacity while we made ten gallons of lemonade (2 5-gallon jugs).


We learned about concentration and that we had to make sure the lemonade mix dissolved. We also taste-tested to see if we thought the concentration of our solution was too low, too high, or just right.

We made the final copy of our menu (we had made a rough draft the day before on chart paper, but they really liked the idea of using a chalkboard "like a real restaurant"). I wrote the small parts, but otherwise... all kid-done!
 We decided who would work what jobs, what shifts. As it turned out, most of the students really wished they had more time to work.
 We originally had made signs for the lemonade stand (after examining persuasive advertisements- freebie here!), but the principal asked that we only sell to adults, so we didn't put many of our signs up around the school. (It didn't seem fair to advertise it to the kids who couldn't have any!) So instead, we used our signs to go around the table.
 We were BUSY. We had a line before we could even get set-up. Next year, I think we'll be doing most of the set-up before lunchtime, just so that we don't have as much to do to get selling!
 My husband was amazing. We were in between the time he was in classes, and the time he left for his internship- and he spent the entire morning running around town to pick things up for us, and then helping mix up the lemonade and helping run the stand the rest of the day. Not sure how we would've done it without him- and the students all voted that he should get a free cookie for his troubles.


You can see how busy we were. We had our lemonade stand during a mile run-walk for the whole school that many parents attend. We are a big school (7-8 classes per grade level, K-3), so this meant a lot of customers!

We even had some special customers, like the principal, superintendent, and the MAYOR- thanks to my students writing friendly letters to invite them. They were disappointed that Barack Obama didn't make it, though. We sold just about all of our ten gallons of lemonade.


We had also written business letters to local places- and our local Subway donated 250 cookies and 200 cups, our local BP donated plenty of large bags of ice, and our local Walgreens donated all of the lemonade mix AND a volunteer while the lemonade stand was running. She's in this picture on the right, and really pitched in and got involved helping to watch over our cashiers.


All in all, with the help of parents, local businesses, and our two guest speakers (a local entrepreneur and a publicist who helped us write a news release), we ended the lemonade stand making almost $350 for Henryville Schools to rebuild after being hit by a tornado.

We were even featured in the newspaper with a color picture of 2 students, and 3 other students quoted. It's no wonder, though, with advertising like this...


Haha- just kidding. We didn't put this one up, but one of the girls in my class made it at home from a Diet Pepsi ad. Didn't you know, Sofia Vergara loves our lemonade?

It was a huge success. HUGE. Not only did we make a LOT of money, but the amount of academic learning packed into the project was amazing. Plus, I had the kids write about it and got to read things like, "I learned that just 'cause I'm small doesn't mean I can't do big things."

I am so proud of the kids for being so passionate and convincing me to give it a try. I am proud of myself, to be honest, for taking it on even though it's the end of the year, my first year teaching my own class, and my first year at this school.

Yes, it was a lot of work... but if you ever get a chance to dive into a big project like this, DO IT! So worth it!